We have many customers running Asterisk PBX using our speech services, and these work very well together, however we often hear of users running into difficultly installing and configuring Asterisk or UniMRCP before they even have a chance to set up the LumenVox services.
In this article, and the accompanying video series, we will go through the installation and configuration of Asterisk 13, UniMRCP 1.3.0 and LumenVox 13.1 by way of a practical example to show the various steps involved.
Before we begin, let's go over the basic structure - along with some general assumptions regarding the installation approach :
# yum install -y epel-release dmidecode gcc-c++ ncurses-devel libxml2-devel make wget openssl-devel newt-devel kernel-devel sqlite-devel libuuid-devel gtk2-devel jansson-devel binutils-devel libtool jansson-devel
...you may run into some other packages that are required along the way, but these should cover most of the things you will need.
Move to the /usr/src folder and get a copy of the PJSIP source that will be needed, then unpack it
Move into the new folder that was created, containing the pjsip project source files and then run the configure script as shown below:
The next four commands will build, install and link the pjsip libraries:
# make dep
# make
# make install
# ldconfig
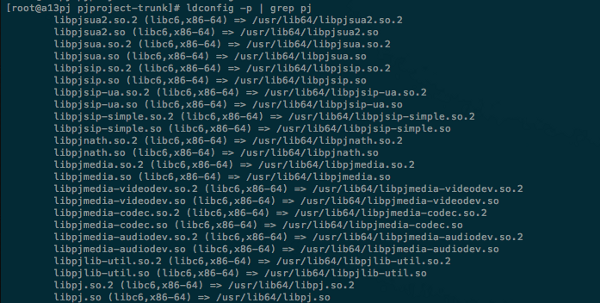
To verify that the PJSIP libraries have been dynamically linked, use the following command:
# ldconfig -p | grep pj
You should see a screen like this:
Installing Asterisk 13
To build and install Asterisk 13 from source, change directory to /usr/src
# cd /usr/src
Use wget command to download the tarball from downloads.asterisk.org
# wget
http://downloads.asterisk.org/pub/telephony/asterisk/asterisk-13-current.tar.gz
Use tar to unpack the Asterisk source code into a new directory named asterisk-13.4.0 then cd into the directory
# tar -zxvf asterisk-13-current.tar.gz
# cd asterisk-13.4.0
The next set of commands will build and install Asterisk.
# ./configure --libdir=/usr/lib64
If you get any errors here, it probably means you have some tool or dependency missing that the configuration script needs. Typically the error will indicate what it needs, so you should install the missing components then re-run the ./configure script above, then once successful, continue on.
You should see a screen similar to this when it's successfully configured:
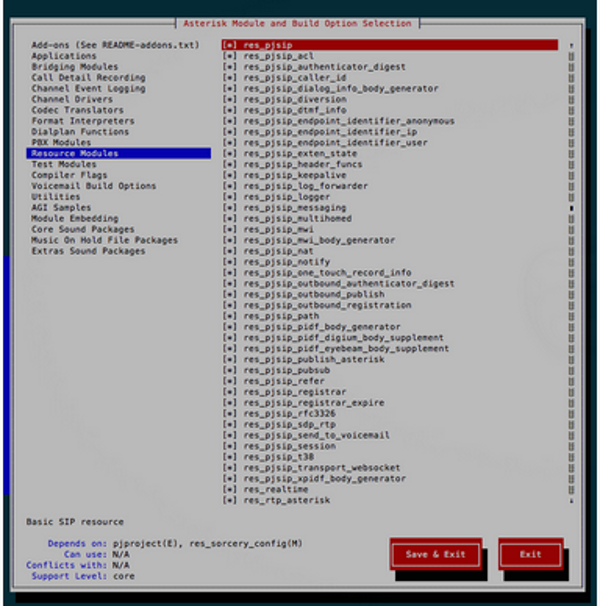
Run the make menuselect command to verify if the pjsip channel driver dependencies have been successfully installed
# make menuselect
Use the arrow keys to navigate to “Resource Modules” in the left column, about halfway down the list. Press the right arrow key and then scroll down until you see the list of modules beginning with “res_pjsip_”.
If these modules have [XXX] to the left of their name then the dependencies have not been met. You’ll need to go back to the /usr/src/pjproject directory, run the “make distclean” command and start over carefully looking for any error messages and proceed from there.
If you see [*] instead of [XXX] then the res_pjsip module’s dependencies have been met and you can proceed to the next steps. Your menuselect screen should look like this if everything was installed correctly:
After exiting the menuselect screen the next set of commands will build and install Asterisk along with a set of sample configuration files.
# make && make install
# make samples
Use the following command to setup Asterisk to start at boot time.
# make config
To immediately begin the Asterisk service without the need to reboot first.
# service asterisk start
To connect to asterisk
#asterisk -rvvvvvvvvvvvvvvv
You should see the something like this to confirm that asterisk is up and running:

Now, quit from the Asterisk console before moving on...
*CLI> quit
Simple dialplan to test Asterisk configuration
Edit the /etc/hosts file with the following settings and add a line for the IP address of your server and hostname (note that your IP address will almost certainly be different than the one shown here):
172.18.2.111 EL6-VBOX
TIP: Make a backup copy of the /etc/asterisk/pjsip.conf file before we start any modifications, so that you will always have a copy of the original for later reference. Also, there is a sample copy of this file attached to the bottom of this article that you can download if you prefer.
# cp /etc/asterisk/pjsip.conf /etc/asterisk/pjsip.orig
Edit the /etc/asterisk/pjsip.conf file with the following settings:
[transport-udp]
type=transport
protocol=udp
bind=0.0.0.0
[6001]
type=endpoint
context=public
disallow=all
allow=ulaw
auth=6001
aors=6001
[6001]
type=auth
auth_type=userpass
password=password
username=6001
[6001]
type=aor
max_contacts=1
TIP: Make a backup copy of the /etc/asterisk/extensions.conf file before we start any modifications, so that you will always have a copy of the original for later reference. Also, there is a sample copy of this file attached to the bottom of this article that you can download if you prefer.
# cp /etc/asterisk/extensions.conf /etc/asterisk/extensions.conf.orig
Edit the /etc/asterisk/extensions.conf file with the following settings (from our Testing the LumenVox Installation on Asterisk knowledge base article):
[public]
exten = 100,1,Goto(hello-world,s,1)
exten = 101,1,Goto(lumenvox-mrcp-tts-test,s,1)
exten = 102,1,Goto(lumenvox-mrcp-asr-test,s,1)
exten = 103,1,Goto(lumenvox-test,s,1)
[default]
[hello-world]
exten = s,1,Answer()
same = n,Wait(1)
same = n,Playback(hello-world)
same = n,Hangup()
[lumenvox-mrcp-tts-test]
exten = s,1,Answer
same = n,Wait(1)
same = n,MRCPSynth(Welcome to LumenVox)
same = n,Verbose(1, ${SYNTHSTATUS})
[lumenvox-mrcp-asr-test]
exten = s,1,Answer()
same = n,Wait(1)
same = n,MRCPRecog(builtin:grammar/boolean,&f=beep)
same = n,Verbose(1,Status is: ${RECOGSTATUS} and Result is: ${RECOG_RESULT})
[lumenvox-test]
exten = s,1,Answer
same = n,Wait(1)
same = n,SpeechCreate
same = n,SpeechLoadGrammar(yesno,builtin:grammar/boolean)
same = n,SpeechActivateGrammar(yesno)
same = n,SpeechBackground(beep)
same = n,Verbose(1,Result was ${SPEECH_TEXT(0)})
same = n,Verbose(1,Confidence was ${SPEECH_SCORE(0)})
Restart asterisk so that these changes take effect
CLI> core restart now
Configure SIP Phone and test the Hello World prompt playback
In this example, we're using an X-LITE SIP Phone, but you should use whichever SIP-phone / Soft-phone you are most comfortable with.
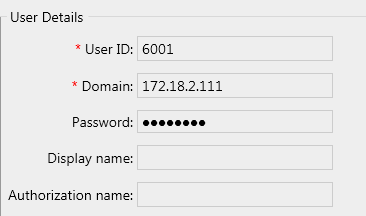
Be sure to set Domain to the IP address of the asterisk server, the UserID is 6001 and Password is password (both of which we configured in the PJSIP settings above)
Open an asterisk console window, with some verbosity
# asterisk -rvvvvvvvvvvvvvvv
Use the SIP phone to dial extension 100. You should hear a female voice saying "Hello World" and the asterisk console screen should look similar to this:
Installing UniMRCP dependencies 1.3.0
Navigate to the /usr/src directory
# cd /usr/src
Use wget command to download the tarball from unimrcp.org
# wget
http://www.unimrcp.org/project/component-view/unimrcp-deps-1-3-0-tar-gz/download –O unimrcp-deps-1.3.0.tar.gz
Use tar to unpack the unimrcp-deps source code into a new directory name unimrcp-deps-1.3.0 then cd to the directory
# tar -zxvf unimrcp-deps-1.3.0.tar.gz
# cd unimrcp-deps-1.3.0
Run the script ./build-dep-libs.sh and follow the instructions.
# ./build-dep-libs.sh
Make note of the installation directory and type y to continue installing the APR libraries and Sofia-sip.
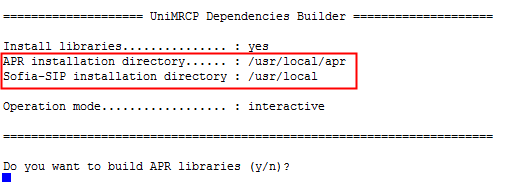
You should confirm installation of the APR and Sofia-SIP libraries when prompted - these are both required by UniMRCP. This will complete the dependency installation requirements for UniMRCP, which can be installed next.
Installing UniMRCP
#cd /usr/src
# wget
http://www.unimrcp.org/project/component-view/unimrcp-1-3-0-tar-gz/download -O unimrcp-1.3.0.tar.gz
# tar -zxvf unimrcp-1.3.0.tar.gz
# cd unimrcp-1.3.0
# ./bootstrap
If you get any error messages about any missing components or tools here, you should install them, then rerun ./bootstrap before running the next configure command:
# ./configure --with-apr=/usr/local/apr --with-apr-util=/usr/local/apr
You should see a summary report similar to this:
****************************** REPORT ******************************
UniMRCP version............... : 1.3.0
APR version................... : 1.5.1
APR-util version.............. : 1.5.4
Sofia-SIP version............. : 1.12.11-225-g94cb919
Compiler...................... : gcc
Compiler flags................ : -g -O2 -pthread
Preprocessor definitions...... : -DLINUX -D_REENTRANT -D_GNU_SOURCE
Linker flags.................. :
UniMRCP client lib............ : yes
Sample UniMRCP client app..... : yes
Sample UMC C++ client app..... : yes
Misc
ASR client lib and app... : yes
UniMRCP server lib............ : yes
UniMRCP server app............ : yes
Demo synthesizer plugin....... : yes
Demo recognizer plugin........ : yes
Demo verifier plugin.......... : yes
Recorder plugin............... : yes
Installation layout........... : classic
Installation directory........ : /usr/local/unimrcp
********************************************************************
Assuming this worked correctly, you should then build the modules as shown here:
# make
# make install
Once this is completed, you can proceed to installing the asterisk-unimrcp modules...
Installing asterisk-unimrcp modules
Change into the /usr/src folder again and download/unpack the asterisk-unimrcp package we want to build:
#cd /usr/src
# wget
http://www.unimrcp.org/project/component-view/asterisk-unimrcp-1-3-0-tar-gz/download -O asterisk-unimrcp-1.3.0.tar.gz
# tar -zxvf asterisk-unimrcp-1.3.0.tar.gz
Once unpacked, we can move into the asterisk-unimrcp folder and run the bootstrap and configure scripts as shown below
# cd asterisk-unimrcp-1.3.0
# ./bootstrap
# ./configure --prefix=/usr/lib64/asterisk/modules
If this is all successful, you should see the following report:
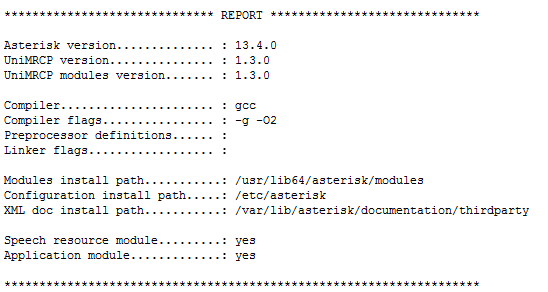
Which means you can continue to build the asterisk-unimrcp modules:
# make
# make install
Check to make sure that the following files exist:
# ls /etc/asterisk/mrcp.conf
# ls /etc/asterisk/res-speech-unimrcp.conf
# ls /usr/local/unimrcp/conf/client-profiles/lumenvox.
xml# ls /usr/local/unimrcp/conf/unimrcpclient.
xmlAll of these files should exist in the locations indicated. If you find one or more is missing, please recheck the recent instructions - in particular, verify that you ran "make install" correctly, which is what generates these sample configuration files.
Follow the instruction on our Installing and Configuring UniMRCP modules to copy and paste the contents of these files. You may want to make copies of the original files before making any changes.
Note: Make sure the RTSP port of the MRCP server-port = 554 is correct in /etc/asterisk/mrcp.conf. Also, there is a sample copy of this file attached to the bottom of this article that you can download if you prefer.
Start up asterisk if it's not already running with the -c option (console).
# asterisk -cvvvvvvvvvvvvvvvvvvvv
If asterisk is already running then use the -r option (remote) to connect to asterisk console
# asterisk -rvvvvvvvvvvvvvvvvvvvv
Check to make sure that the unimrcp modules are loaded
CLI> module show like
mrcpYou should see something like this:

If you do not see this, restart asterisk and try again:
CLI> core restart now
CLI> module show like
mrcp
Installing LumenVox
Download and install LumenVox following the instructions in the Linux Installation article, which involves creating or updating the /etc/yum.repos.d/LumenVox.repo file according to your Linux Operating System. In the case of CentOS6 64-bit that we're using here, the file should look like this:
###################################################
[LumenVox]
name=LumenVox Products x86_64
baseurl=https://www.lumenvox.com/packages/EL6/x86_64/
enabled=1
gpgcheck=0
###################################################
Edit the media_server.conf settings file and configure the sip_port = 0 setting to disable the LumenVox SIP interface altogether, since UniMRCP will only be communicating with LumenVox using MRCPv1 (RTSP).
We can run some basic sanity check to make sure LumenVox is configured and working correctly.
# lv_show-config -a
Note that we expect the MRCPv2 (SIP) tests to fail here, because we disabled the sip_port in the LumenVox media_server.conf settings above. If you would like more information about the results of this test by reading our Running lv_show_config article.
Testing the installation of LumenVox, Asterisk and UniMRCP
Use the same softphone (X-LITE) that you configured earlier to make some test calls to verify that everything is installed and working.
Dial extension 100
This will test asterisk basic playback of the "Hello World" prompt. You should hear a female voice saying "Hello World". This verifies that Asterisk and PJSIP are installed and configured correctly (without using UniMRCP or LumenVox)
Dial extension 101
This will test MRCPSynth(Welcome to LumenVox). You should hear the "Welcome to LumenVox" TTS voice audio. This confirms that Asterisk, UniMRCP (MRCPSynth) and LumenVox TTS services are all working and configured correctly.
Dial extension 102
This will test MRCPRecog(builtin:grammar/boolean,&f=beep) - you should say either "yes" or "no" after you hear the beep. A successful result indicates that Asterisk, UniMRCP(MRCPRecog) and LumenVox ASR services are all working and configured correctly.
Dial extension 103
This will test ASR with Generic Speech API. A successful result to this test indicates that Asterisk, UniMRCP (using the Generic API), LumenVox ASR services are all working and configured correctly.
Success
If you reach this point, this means you have successfully installed and configured Asterisk 13, UniMRCP 1.3.0 and LumenVox 13.1
From here, you can continue on to build your own Asterisk applications. For more advanced examples and additional tips, please visit our LVDN site at https://developer.lumenvox.com, which has a number of useful articles and examples, such as the Asterisk Speech-Enabled Call Router in Dialplan example.
Sample Configuration Files
The file attachments below were used in the making of the videos - you may use these as a reference if you like, however be aware that any IP addresses in these settings may need to be updated to match your specific machine, as was mentioned above and in the videos.