Prophecy 14
| Reference Number: AA-02027 Views: 12852 |
0 Rating/ Voters
|
 |
Introduction
This document describes configuration notes for the LumenVoxASR and TTS servers running with Voxeo Prophecy version 14. In addition to a server with Prophecy 14 installed and licensed, you should already have downloaded, installed, licensed and tested the LumenVox ASR and TTS server. Voxeo Prophecy Installation Notes
LumenVox Installation Notes
This document was written for LumenVox 12.2.100, though it should apply for any post-10.0 release of LumenVox.
LumenVox ConfigurationThere are a few changes from the default configuration that must be made to the media_server.conf located in C:\Program Files\Lumenvox\config\ in Windows and /etc/lumenvox/ in Linux. - The value of mrcp_server_ip must be set to the IP address of the machine that LumenVox Media Server is installed on.
- The value of sip_port must be changed from the default 5060 to 0 to disable SIP interface. LumenVox ASR and TTS servers communicate with Prophecy via MRCP.
Note: For LumenVox version 12.1 and above, there is a new configuration setting "num_channels" that specify the maximum number of channels to be used on the server without exceeding the available licenses. It is important that this "num_channels" is set correctly to allow the Media Server to automatically scale resource usage for the specified number of channels. The default value for "num_channels" is 200
LumenVox - ASRHere is an overview on how to configure LumenVox ASR server for Prophecy. The following details are based on the Prophecy documentation - Configuring LumenVox ASR 10 for Prophecy and How to add a Third Party TTS Language to Prophecy. Additional notes and comments were added by LumenVox as appropriate from our own configuration and testing. - Create and Add the LumenVox ASR server to Voxeo Prophecy Community.
- Add the LumenVox ASR Service to Prophecy.
- Add the LumenVox ASR Service to a Resource on the Virtual Platform to make the LumenVox ASR service available to applications.
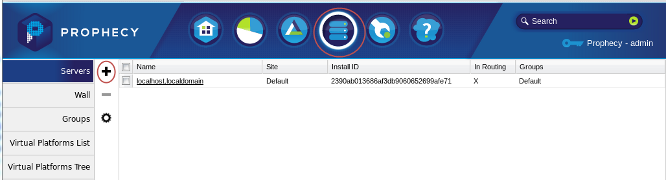
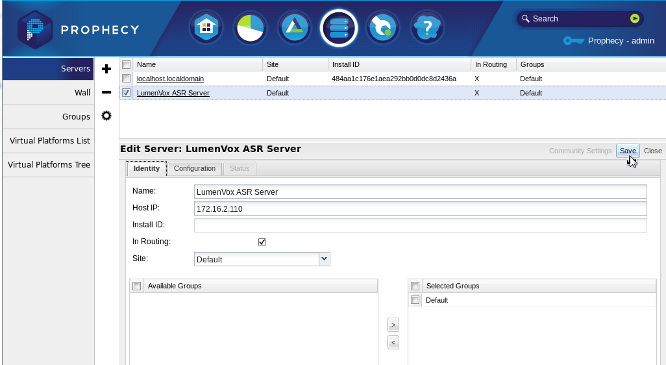
To Create and Add LumenVox ASR server to Voxeo Prophecy Community- Prophecy Commander toolbar > Servers > New Server. The New Server pane is displayed.
- In the Name field, enter a name to use in Prophecy to reference the ASR server, for example, LumenVox ASR Server.
- In the Host IP field, enter the IP address of the LumenVox ASR server, for example 172.16.2.110.
- In the Site field, select the Site that the server will belong to if you have multiple sites. Otherwise, select Default.
- In the Available Groups pane, select the Groups to add this server to if you have more than one groups. Otherwise, select Default.
- Click Save.
Adding LumenVox ASR Service to Prophecy Server- Prophecy Commander toolbar > Servers > Select the name of your LumenVox ASR Server. The Edit Server pane is displayed.
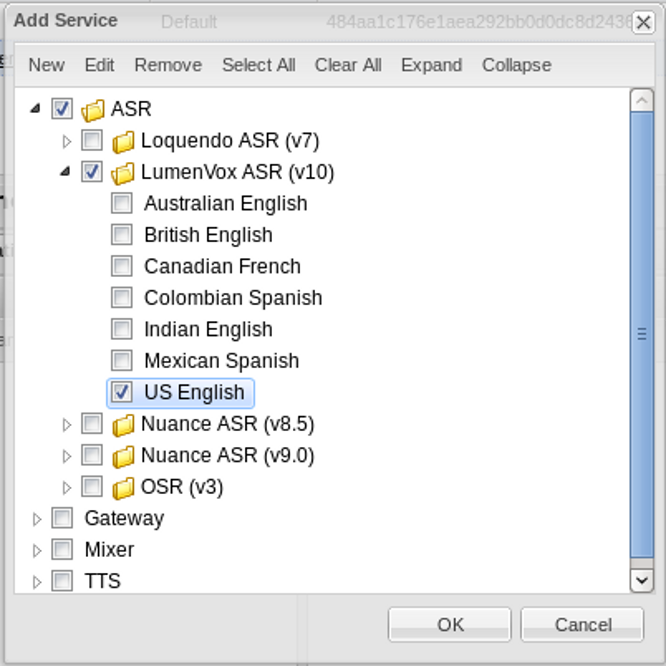
- On the Configuration tab > Services pane > Add. The Add Service dialog is displayed.
- Expand ASR, expand LumenVox ASR (v10), select the ASR Service to add, for example: US English, then click OK.
- In the Edit Server pane, click Save. The Success message is displayed and the Service is added.
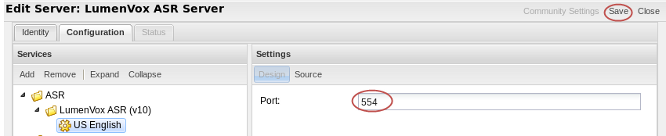
Note: By default, the Prophecy Server > LumenVox ASR (v10) is configured for port 554. The following procedure described how to modify the port if your application requires it. - Prophecy Commander toolbar > Servers. The Server pane is displayed.
- Select the LumenVox ASR (v10) Server. The Edit Server page is displayed.
- On the Configuration tab > Services pane, expand LumenVox ASR (v10), click the ASR Service to modify, for example, US English.
- In the Settings pane, in the Port field, enter the port for the ASR Service (by default this is 554 as mentioned above).
- In the Edit Server pane, click Save. The Success message is displayed and the Service is added.
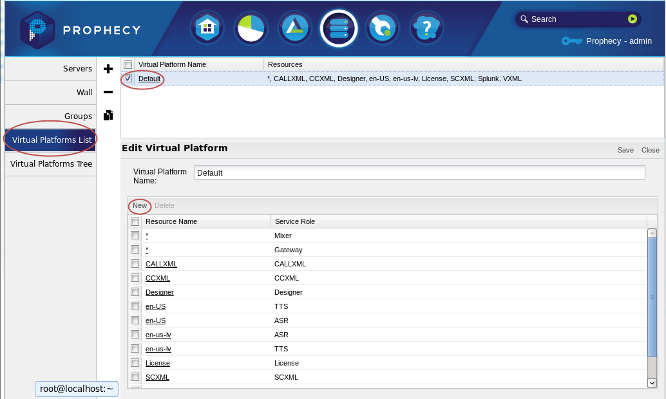
Adding LumenVox ASR Service to a Resource on the Virtual Platform- Prophecy Commander toolbar > Servers > Virtual Platforms List. The Virtual Platform List page is displayed.
- Select the Virtual Platform Name that you want to add the new Resource to, for example, Default. The Edit Virtual Platform pane is displayed.
- Click New to open the Create New Resource dialog.
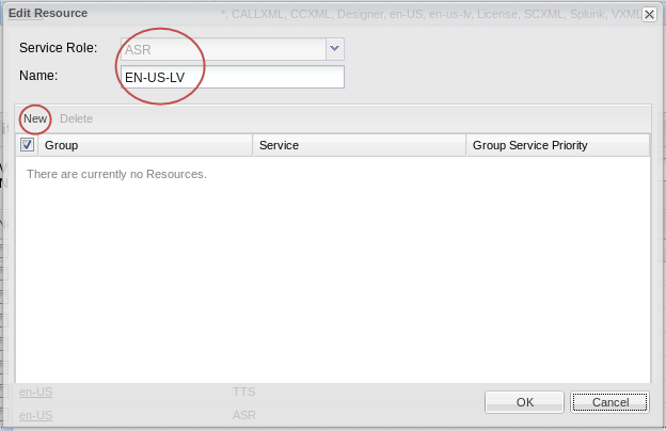
- Select ASR from the Service Role drop-down list and enter the name of the resource to be used in your application, for example, EN-US-LV.
- Click New to open the New Group Service Priority dialog.
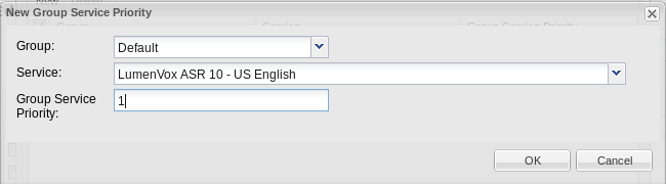
- Select the Group that contains the LumenVox ASR Service from the drop-down list, for example, Default.
- Select the LumenVox ASR Service and enter 1 for the Group Service Priority to make it the highest priority for the group.
- Click OK to save the Service to the Resource.
- In the Create New Resource dialog, click OK to Save the new ASR resource.
- In the Edit Virtual Platform pane, click Save to save the Resource.
- Restart all Prophecy Services.
LumenVox - TTSHere is an overview on how to configure LumenVox TTS server for Prophecy. Note that for users migrating from Prophecy 13, it did not have knowledge of LumenVox TTS, so you needed to create a generic TTS service in order to communicate with LumenVox, however Prophecy 14 now knows about LumenVox TTS, so it is a simple matter of selecting the appropriate option from the available list as described below. - Create and Add the LumenVox TTS server to Voxeo Prophecy Community.
- Add the LumenVox TTS Service to Prophecy.
- Add the LumenVox TTS Service to a Resource on the Virtual Platform to make the LumenVox TTS service available to an applications.
Note: The LumenVox ASR and TTS service can be configured as a single server entity in Prophecy or as two separate server entities in Prophecy. If the LumenVox ASR and TTS service are configured as two separate server entity in Prophecy then each server must have a unique Host IP address. To Create and Add LumenVox TTS server to Voxeo Prophecy Community- Prophecy Commander toolbar > Servers > New Server. The New Server pane is displayed.
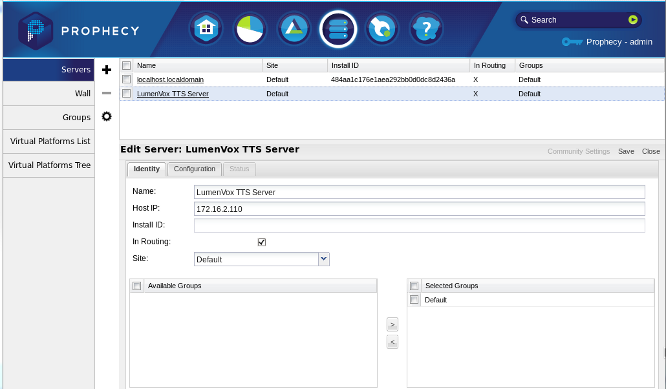
- In the Name field, enter a name to use in Prophecy to reference the TTS server, for example, LumenVox TTS Server.
- In the Host IP field, enter the IP address of the LumenVox TTS server, for example 172.16.2.110.
- In the Site field, select the Site that the server will belong to if you have multiple sites. Otherwise, select Default.
- In the Available Groups pane, select the Groups to add this server to.
- Click Save.
Adding LumenVox TTS Service to Prophecy Server
- Prophecy Commander toolbar > Servers > Select the name of your LumenVox TTS Server. The Edit Server pane is displayed.
- On the Configuration tab > Services pane > Add. The Add Service dialog is displayed.
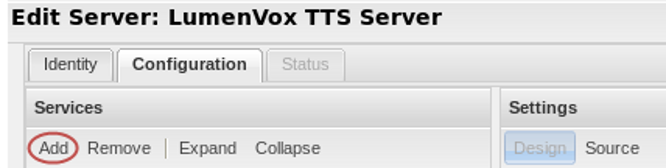
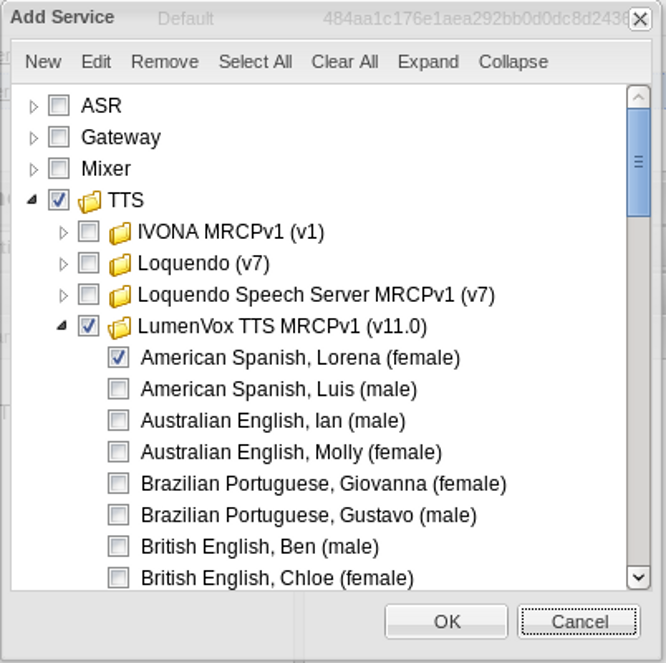
- Expand TTS, expand LumenVox TTS MRCPv1, select the voice(s) to add, for example, American Spanish, Lorena (female), then click OK.
- In the Edit Server pane, click Save. The Success message is displayed and the Service is added.
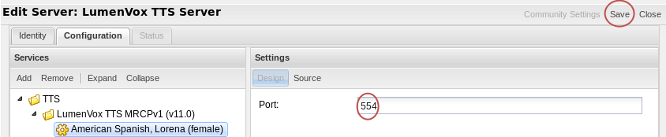
Note: By default, the Prophecy Server> LumenVox TTS MRCPv1 (v11.0) is configured for port 554. The following procedure described how to modify the port if your application requires it. - Prophecy Commander toolbar > Servers. The Server pane is displayed.
- Select the LumenVox TTS Server. The Edit Server page is displayed.
- On the Configuration tab > Services pane, expand TTS, expand LumenVox TTS MRCPv1 (v11.0), click the voice to modify, for example, American Spanish, Lorena (female).
- In the Settings pane, in the Port field, enter the port for the TTS Service (by default this is 554 as mentioned above).
- In the Edit Server pane, click Save. The Success message is displayed and the Service is added.
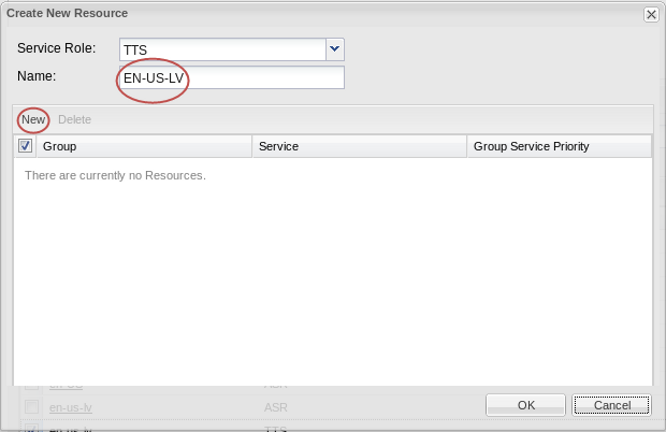
Adding LumenVox TTS Service to a Resource on the Virtual Platform- Prophecy Commander toolbar > Servers > Virtual Platforms List. The Virtual Platform List page is displayed.
- Click the Virtual Platform Name that you want to add the new Resource to, for example, Default. The Edit Virtual Platform pane is displayed.
- Click New to open the Create New Resource dialog.
- Select TTS from the Service Role drop-down list and enter the name of the resource to used in your application, for example, EN-US-LV.
Note: The resource name is not case sensitive but it cannot contain special characters, underscores or periods.
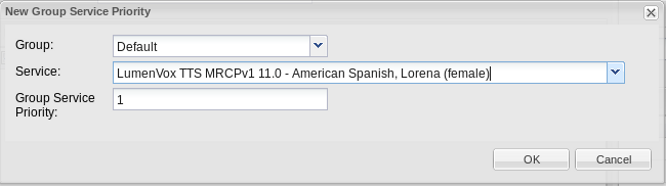
Click New to open the New Group Service Priority dialog. - Select the Group that contains the LumenVox TTS Service from the drop-down list, for example, Default.
- Select the LumenVox TTS MRCPv1 Service and enter 1 for the Group Service Priority to make it the highest priority for the group. By
- Click OK to save the Service to the Resource.
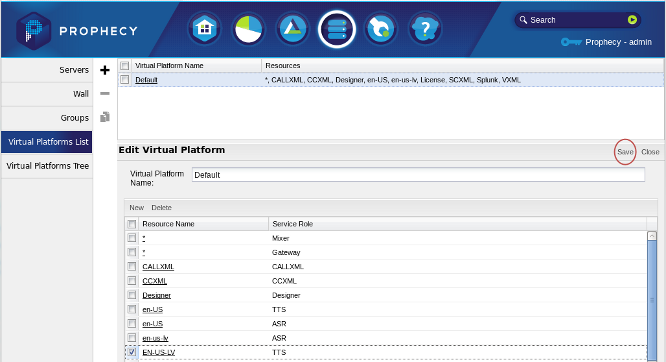
- In the Create New Resource dialog, click OK to Save the new TTS resource.
- In the Edit Virtual Platform pane, click Save to save the Resource.
- Restart all Prophecy Services.
Using LumenVox ASR and TTS – Application
To use the LumenVox ASR and TTS in the application, you must define the Resource Name as the value of the xml:lang attribute in the <vxml> element, for all grammars in your application, or in the <grammar> element for a specific grammer. For example: <vxml version="2.1" xml:lang="EN-US-LV"> Note: When you define the xml:lang attribute for ASR, you are also specifying the language for TTS. Therefore, the Resource Name must be the same for both ASR and TTS services. Otherwise, the application will not function and you will see error about " ASR resource lookup failed" and " TTS lookup failed" in the logs. Testing the LumenVox ASR and TTS Service with Prophecy
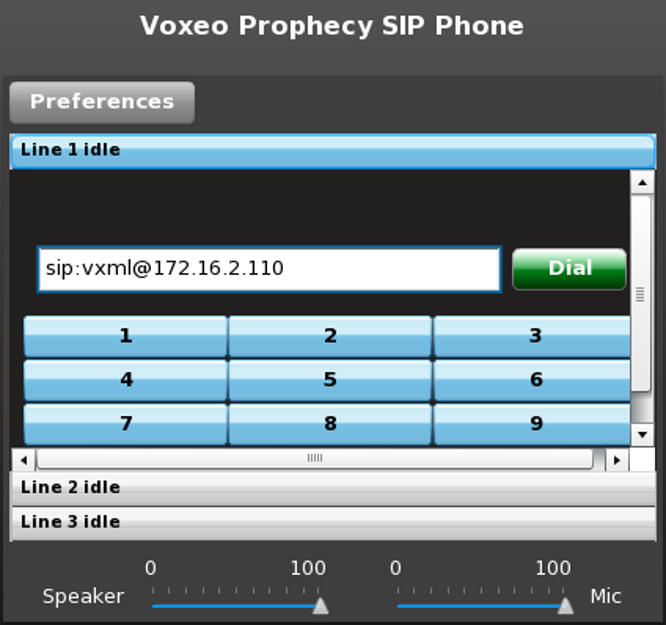
Voxeo Prophecy has several built-in sample XML applications that can be used to test the LumenVox ASR and TTS functionality using Voxeo Prophecy SIP phone . In this example, we will configure the VXML Home application to use the LumenVox ASR and TTS services. - Use your favorite text editor to edit the /opt/voxeo/prophecy/webapps/www/vxml-home.xml file and add the following line to specify the language attribute for LumenVox ASR and TTS
<vxml version="2.1" xml:lang="EN-US-LV">
- Prophecy Commander toolbar > Dashboard > Select the Prophecy SIP Phone.
- Enter the SIP URI of the VXML Home application using the following format sip:Address@IP address, for example sip:vxml@172.16.2.110
- Click Dial.
If everything is working as expected, you should hear the following prompt " Welcome to the Prophecy voice XML service....". Otherwise, check to see that the xml:lang attribute (in this example EN-US-LV) is the same as the Resource Name that you added to the Virtual Platforms List. In addition, check the application log file (/opt/voxeo/prophecy/logs/vxml/vxml.log) for any error messages.
Note: In order to test the reservation demo using the LumenVox ASR and TTS service, you will also need to define the xml:lang="EN-US-LV" attribute in the following files:
- /opt/voxeo/prophecy/webapps/www/demo/vxml/res/Times.xml
- /opt/voxeo/prophecy/webapps/www/demo/vxml/res/reserve.vxml
- /opt/voxeo/prophecy/webapps/www/demo/vxml/res/options_voice.xml
- /opt/voxeo/prophecy/webapps/www/demo/vxml/res/intro.vxml
- /opt/voxeo/prophecy/webapps/www/demo/vxml/res/hours.vxml
- /opt/voxeo/prophecy/webapps/www/demo/vxml/res/check.vxml
|